That was made on my Predator, with a 0.6mm nozzle. I also have a CR10S Pro but it just can't print at the speeds that the predator can, plus the predator has a super sticky base that never has failed a print yet.Originally Posted by atownbrg


That was made on my Predator, with a 0.6mm nozzle. I also have a CR10S Pro but it just can't print at the speeds that the predator can, plus the predator has a super sticky base that never has failed a print yet.
wow, I have never seen a 3d printer like that. That must be the Delta configuration or something, very cool. Something i want to try out!
Yes, its a Delta configuration. The extruder is called a "flying extruder" because it moves about half as much as the print head and is suspended further up. Because of that and the fact that the print bed never moves it can print at a faster speed than the typical 3d printer. With a few different parts and lots of knowledge they can be insanely fast or huge. This one is obsolete as of a year ago atleast, but there are other delta printers out there.
This is the 3d printed fixture/jig I did. Basically used it to feed the pipes through the band saw to cut close to the right angles, then clean them up a bit with a flapper wheel on a grinder. FYI, stainless cuts real slow, took me about 20 minutes per tube.
Polished up the tubes and taped them together. This is a task that seems to require more hands than what I have because I never could get it bang on square.
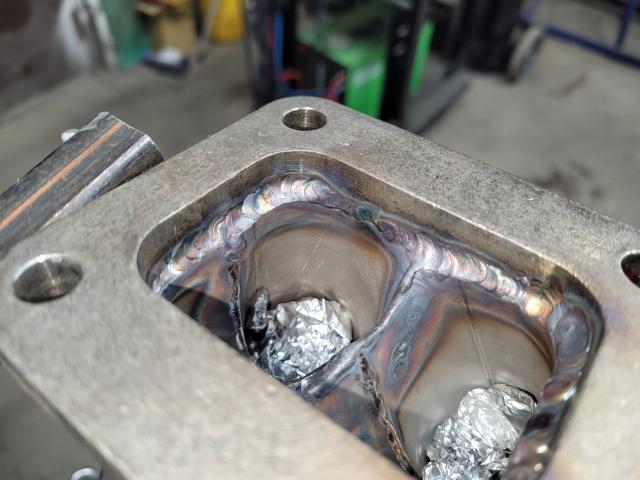
Then used some of the elbows to help form the transition pieces that will go from the oval on the head to the round turbo pipes. The circumference of the oval on the flange is damn near the exact same as the outside diameter of 1.5" pipe. So I cut four 1" pieces, heated them up, squished in the vice, used a flapper wheel to make them a tad smaller, polished them and squeezed them into the flange ports then tack welded them in place.
Next step is to start trying to piece together each runner, then find a way to cut a hole in the collector somewhere to put the waste-gate on? Not really to sure what I am going to use to do that or how to do it.
Mad skills and problem solving - geezer approvesI know that you can buy these kinds of parts online but I doubt they will have the same quality and fitment as your end product. I bought a set of (REALLY) cheap ebay headers for my Hyundai and it swallowed a week of my time fixing the gawdawful manifold ports and inner collector overhang...
support the forum that supports you - join and donate to MightyRam50.Net today! donations unlock the edit function
There are places that sell the collectors cut and tack welded ready for fitment, but for the price of them I figured I would try and make it. If I could find a decent manifold that I know would fit I most likely would have bought it to save time. But there are some people like me that still wouldn't be happy with it because it's not orientated idealy, or something is too close lol.
So I got a new set of lower control arms because I cut the spring pockets off my original ones. Tried to mount the shock under the bracket and use the OEM spring, the QA1 shock is too short for that. Also the adjusting knobs and lower part of the shock housing starts to interfere with the LCA. So I drilled out the threaded spots for the shock mount and removed the rest with a chisel.
I opened up the one side of it to allow the shock to sit flat on the LCA and not the spring pocket piece, still need to square up the hole on the other side and grind off the remaining piece of weld that is left.
The shock does fit this way relatively well, I dont think in this picture it was totally square with the world, it needs to be a bit more to the left. I do plan on rounding off the mounting tabs a bit on the shock, if needed I will also clearance the area of the first coil to allow it not to touch. I did test this earlier the other day, these shocks do fit inside the OEM springs. The springs do not interfere with the compression/rebound adjustments, but to adjust them I will most likely have to jack the truck up to allow the springs to relax so I can reach in.
Cant wait until after this month is over, currently in the middle of an outage at work and don't have much free time for this.
You didn't want to completely remove the spring seat on the LCA? I don't think it will affect the structural integrity of the control arm and it will give you some finger space to adjust the damper/rebound. It will also give you that extra wriggle room to adjust the lower shock mount.
*addendum - I did see that you had made that mod to the original LCA's
Last edited by geezer101; 04-08-2022 at 02:10 PM.
support the forum that supports you - join and donate to MightyRam50.Net today! donations unlock the edit function
Yeah, that was my first trial. Thought of cutting that lower spring seat area totally out and moving the lower shock mount to the very bottom of the control arm then strengthening the sides but that wouldnt give me the difference I needed for those QA1 springs, plus it would be ugly.
I think for this season I will run these shocks with the OEM worn springs, then work on modifying the upper spring pocket/frame area next winter to run the QA1 as a coilover.
I forgot that you haven't been able to successfully get a complete coil over in there due to the top mount issues. This is going to take some careful planning to pull off without leaving you with a cut up spring tower and no suspension. It takes some guts
support the forum that supports you - join and donate to MightyRam50.Net today! donations unlock the edit function
Yesterday after work I finished up the work on the fuel tank and dropped it off to get powder coated, also spent a bit of time on the one front corner.
Its a bit of a procedure, but if you leave the top of the QA1 shock threaded on just a few turns with the small nut holding it in the chassis, push the OEM coil up into its normal home, put the bushing bolt into the frame. Then using slightly longer bolts I loosely bolted the QA1 shock to the control arm, started jacking it up until I was able to pop it into position, replace the long bolts with proper ones and tighten up. Noticed the control arm wanted to sit naturally more forward than where it should be, so I used a ratchet strap to pull it to the rear while jacking it up. Got it to the point where I was able to connect the upper control arm and lower control arm to the spindle.
Unfortunately I am going to undo part of what I did to try and rotate the spring, reason for that is it doesn't sit in the pocket in the lower control arm properly, its a bit out on the one side, looks like it needs to be clocked a bit more counter clockwise. Also forgot to mention that I did not install the rubber isolator pad that sits on the top of the OEM spring, reason for this is to try and gain a bit more space lol.
Last night I got the spring positioned properly and now it sits in the lower spring pocket nice. Everything is still bolted together loosely. This shows how much clearance there is for the compression and rebound adjustment knobs inside the coils. Its tight but they do turn and don't rub, I don't think the spring will move enough during travel to move and hit the knobs.
And this is what it looks like. It still boggles my mind how large that upper spring pocket is and how far out of the frame it sits. Definitely going to be modifying that in the future, clean it up and make it open and easily adjustable/easier for maintenance. FYI, I still like the look of the 14" rotor on here

Welded up the collector for the turbo. My hand control definitely needs more practice, but its welded for now. I am going to put a second weld over the first with a thinner filler to get it to look nicer and fill in the undercut areas a bit. The flange weld isn't undercut but on the collector tubes there are spots that are. Some of the tube welds are oxidized a bit because of the extended tungsten stick out I needed to get in there. Also going to have to work on the heat control more when its time to weld the tubes together, I can see it warping and twisting more if I keep that up lol.
Your welds are thicker than the ebay header welds. Anyone who is critical of what you're doing should try it themselves. You're not going to get many cake-walk welds making these either. This is one skill I wish I could get invested in... can't wait to see the end product!
support the forum that supports you - join and donate to MightyRam50.Net today! donations unlock the edit function


Good looking welds colt ~ there will be less heat input if you stop welding more often or when position becomes uncomfortable ~ n' let things cool down ~ try to increase your speed of travel while welding it helps reduce heat input too ~ this minimizes discoloration of the metal BUT the real importance of minimizing heat input is to retain the qualities of the base metal i.e. Crest keeps it's corrosion resistance ~ You deserve a straight A in welding Sir..!
Last edited by xboxrox; 04-18-2022 at 07:52 PM.
Picked up my fuel tank from getting powdercoated, vacuumed it out, rinsed it, then let it sit in the sun with a shop vac blowing into it to ensure as much moisture was out if it as I could get. Dropped it into the frame, need to mount the pump, sending unit and wire it up next.
This is what the manifold ended up looking like. Since this pic was taken I did polish the tubes yesterday and its ready for welding.
The little purge box I made sitting ontop of one of the ports for when I was welding the adapter sleeve into the flange. I did fully weld these sleeves into this flange and its still fairly flat. Welded this side of the sleeves and the inside of them too (they are pressed into the holes a bit).

Tank looks good, manifold is coming along nicely. Your rear axle and links look pretty clean too
support the forum that supports you - join and donate to MightyRam50.Net today! donations unlock the edit function
Thanks, the axle still is not painted (it wasn't high on my to do list).
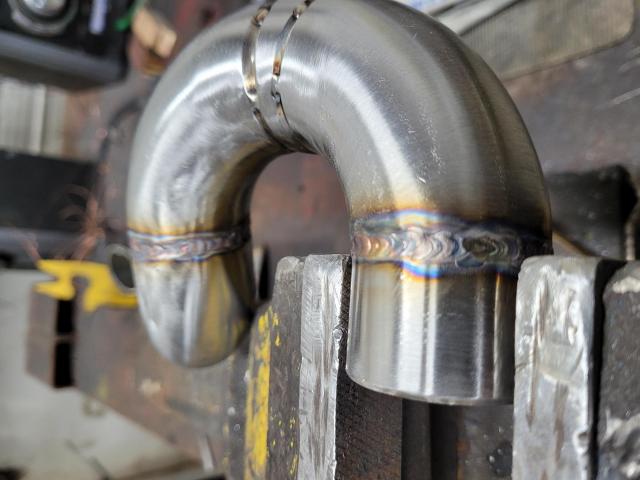
A pic of the polished pipes tac welded together.
Managed to weld two of the joints last night after work. Probably wont be back at it until Friday.
Fuel tank work is done. Just need to extend the fuel lines and wires on it.
Manifold is mostly done. The 4 runners are fully welded, need to work on the wastegate now, probably have to use the plasma cutter to get a hole in the collector for it then clean it up with the carbide burrs. I am going to try and drill the hole with my drill press and a hole saw but I am doubtful its going to work. Also plan on making a support bracket for the weight to go back down lower on the block to help with the weight.
This is my planned location for the wastegate, close to the collector.
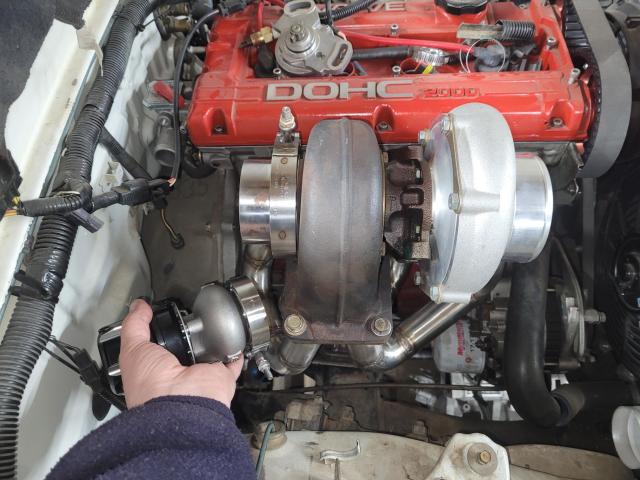
Ooooh that's a big turbo. This is going to be a busy truck once it's on the road. You didn't opt to have the coolant manifold relocated to the front of the head? There's a freeze plug there that can be knocked out and an adapter fitted - this is how the DSM guys work around RWD swaps.
support the forum that supports you - join and donate to MightyRam50.Net today! donations unlock the edit function
...and the fuel tank looks military grade. Nice work
support the forum that supports you - join and donate to MightyRam50.Net today! donations unlock the edit function
Whew !! How do you plan to use this creation, 1/4 mile timeslips ? Maybe under 13 seconds ? WOW
The turbo I believe is a precision turbo 6266? Its been a while since I bought it lol. I thought of relocating the motor to the front but figured there is lots of room in there still so I just moved the motor forward. I did this with the steering system off the truck, built the motor mounts, tranny mounts then when it came to putting the steering system back on I found the drag link bar its an inch or less from the flex plate. If the motor was left in the rear position then I dont think it would be an issue. I am doubtful the chassis will flex enough to have it move and touch, but we will see.
This summer I will be racing in the Miles of Mayhem event if I can get it going by then. ~1700 kms in 5 days and racing each day. Its an 1/8 mile event but I am aiming to get it to 1/4 mile tracks. I will be limited to the 11.5 in the 1/4 until I get a cage built, which I plan on doing this coming winter, after that perhaps get into the 10s?
My LS3 E36 BMW I built did 11.8@121 with a 6 speed manual and an independent ford 8.8 I put in the back. I am expecting this should do considerably better (more traction, less weight, more power, and no shifting delays).
Have you read LSRMikes' thread for his truck? You are sort of heading down his path - it was a mad build using the G63B 2.0 for the basis.
support the forum that supports you - join and donate to MightyRam50.Net today! donations unlock the edit function
62mm, 2.0, auto, stock leafs.... 'should' low 10s, if everything's clicking
 Posting Permissions

 Reply With Quote
Bookmarks