-
Welding and my shop area.
I guess it’s time for an update. The temperature is a warm 98 today. So I will just get caught up on the build until it cools off. The main part of the cabin is near complete. I have the seat mounting bars set in place, and the seat belt bars are in. For the guys that want to use a 5-point harness in your truck there are basic things to keep in mind about belts. First use a 3-inch belt. Avoid the 2-inch belt at all cost. They can do more damage to you in an accident then the stock belt. It comes down to simple weight distributions. The more surface the better. A 2-inch belt will bend into taco shape and now you have a ¼ inch rope for a belt. Not a good feeling. This is why they have banned them in nearly all forms of racing. Second DO NOT mount the shoulder belts above the Scapula of your back, Or shoulder blades. If it is to high then you can crack your spinal cord or sever your head during a crash. This would make for a good story on the 5 PM news. Head flies off during roll. Witness says, it looked like he said “holey shit” as it flue over. During a crash you can experience up to 165Gs of force. So keep in mind a seatbelt must not be pinched or have anything that can cut it with in 2 inches of it at all times. You should also think about the direction of forces applied to it. Keep bends and curves flowing not sharp.
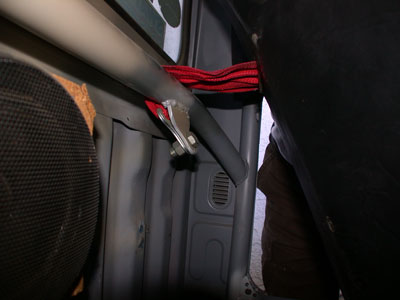
Now here is the main cab structure with some gussets installed. The cross bracing has yet to be installed. So far I have used 60 feet of 1 ½ inch .095-wall tubing and 20 feet of .120 wall tubing just to get this far.

I have had a couple of people ask what it takes to build a good roll cage. Well here I go.
If you want to build a cage for your truck there is some tools you will need. First is the welder. Go out and find a good 220 Volt mig welder. You can use Argon Co2 mix or just Co2. Don’t use flux core. Straight Argon is for Aluminum I have used Co2 for many years and have just become accustom to how it works. A large tank can last me up to 10 years or more at home. I just replaced one of my tanks after 15 years of use. It went through 5 of the big rolls of .030 wires. Co2 burns hotter than Argon mix and you can burn through thin wall steel. It just takes time to get good. I will get into welding later on.

Now you need to find a mandrel bender. DO NOT get a pipe bender. There are some ratcheting low cost ones that work OK and make nice bends. You can find them here.
http://www.tubing-benders.com/?gclid...FQ4iawod4Gxx3A
But if you really want to do the job right then you can expect to spend around 1200 bucks for a good quality tool. Here is a good source for tools and lots of other things you will need to do the job. Keep in mind if you buy something good you only need to buy it once. They still make and sell the tools I picked up back in 1997. You can get a low buck tubing notcher.
http://www.irvansmith.com/scart/index.php

Now when it comes to tools you get what you pay for. I have spent the last 20 years filling up my box. Yard sales, auctions things like that. I set a goal and then collect parts until I have enough to get going on it. Here is my garage and some supplies that people have tossed out that I have found over the years. My nut and bolt collection was a major score.


Now lets talk a little about welding.

"When welding tubing you need to keep an eye on the fit of the tubing." If you have a large gap then you will “burn through” You can fill the gap but it takes time and every time you start and stop the fusion of the metal you take a chance of O2 getting into the weld and producing a pimple or “zit hole”. If you have the gas flow up to high wile using Co2 you can over heat the steel. I run around 12 Cubic Inch Hour. At this rate I can get a good Spray of metal. There are times when it can be an advantage to use a Globular transfer method, manley when filling a large gap between to parts. If the gap is large or the parts are thin there is the option to noodle weld.
Make the fit on your tubing as tight as you can. Spend the extra time and do it right, there is no shortcut in frame building. Remember the forces that will be applied to the cage.


Let’s talk about getting heads ported. My heads have been ported and are ready to be assembled. You will have many people tell you about valve seats and angles. 1,2, or 3 angle grinds. But when you look to improve performance you only need to look as far as the first 2 inch down the ports. Most improvement to air flow is right below and next to the valve. The head on my engine is within .020 of the intake gasket hole and the intake manifold porthole. When it comes to porting a head you need to open up the area right below the valve seat. The exhaust valve seat and valve has a radius seat. Not an angle cut. This allows for better flow of gas out of the combustion chamber. The intake has a 3-angle grind. This allows for a better seal so combustion gases can’t escape into the intake and cause a backfire.

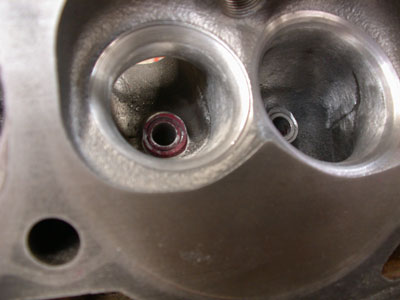
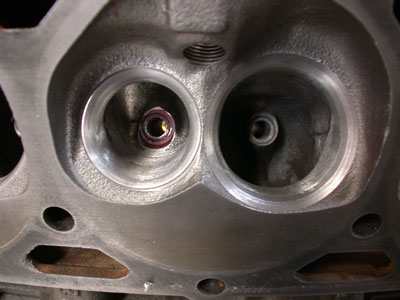
One thing I have seen people do is put larger valves in to a head. This can create larger problems and is more costly to do. The only time you need larger valves is if you are building a blown engine or top fuel car. But if you are dead set on larger valves then just go out and pick up heads that are built with them. It will save you in the end. One thing you should do is look to see how close the valve is to the wall of the combustion chamber. On some heads the valve is very close. So by just clearance that area you can greatly improve the flow. Here is a head that has been clearanced to allow for greater flow. It was opened up by .050 that may not seem like a lot but when you deal with 1000s of an inch it is a lot.


Rear frame is now DONE..........
Last edited by camoit; 06-09-2019 at 03:28 PM.
Members come and members go, But the board keeps track of them.
Come join me at Navarro Mills Lake RV in Texas by clicking HERE.
Find me on FaceBook by clicking HERE.
Or look on YouTube, just Click Here.
Tags for this Thread
 Posting Permissions
- You may not post new threads
- You may not post replies
- You may not post attachments
- You may not edit your posts
-
Forum Rules


 Reply With Quote
Bookmarks